Tuesday, August 20, 2013

Cake Slice Bakers - August 2013: Maple Pecan Chiffon Cake


So much is happening today! For one, today is my parent's 20th anniversary of being married! Which I think is pretty dang awesome for today's day in age where everyone is getting divorced or separated left and right (or does that only seem to be celebrities?). Today also marks my best friend's 19th birthday! Happy birthday, Z! And I can't forget about the Cake Slice Baker's cake reveal of the month!

August's cake happens to be a chiffon cake. I have never made a chiffon cake or angle food cake, yet I have the pan, odd. I have had the pan for several years with the best intentions of baking with it, but I was just never inspired. So needless to say I was happy when my choice of the maple pecan chiffon cake won. That is until a certain incident happened....

You see this pan was stored in my closet because there was no room in the kitchen. You should also know I am deathly afraid of spiders. My dad says I need to see a psychiatrist. I say he needs to realize that spiders are plotting my death. 

Anyways, when I went to get the pan from my closet a spider decided it would be a great time to make it's presence known to me. I screamed and threw the pan at the wall and I'm pretty sure I had my very first heart attack. God, I despise spiders.

Anyways after about 30 minutes of scrubbing that pan clean I got to baking. I thought it was a little weird not to grease the pan, but I must follow those kind of directions. The cake baked up all nice, tall, and fluffy. It looked so beautiful; I was so proud of myself.

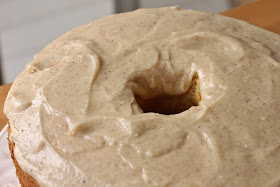
Getting the cake out was kind of tricky though because I didn't know how to get the cake out without manhandling it. I finally managed it with only a few finger indentations on the top. But nothing a little frosting can't fix.

Oh my gosh the frosting is so delicious! It's basically the same frosting from my rice krispie cake, but I wasn't as scared about browning the butter this time, so the frosting had this intense nutty flavor! So good. And the cake was so delicious! It had this perfect brown sugar taste. I did omit th pecans because no one in my family is a big fan of the nuts and I knew no one would eat it if it had nuts in it. But no matter, the entire thing was gone within three or four days. So I will most certainly be making this again!

Maple Chiffon Cake
Slightly adapted from Vintage Cakes by Julie Richardson
Makes 1 10 inch tube pan

Ingredients
2 cups minus 3 1/2 tbsp. unbleached all-purpose flour*
4 1/2 tbsp. cornstarch*
2 tsp. baking powder
1 tsp. salt
3/4 cup dark brown sugar
6 egg yolks, room temperature
1/2 cup canola oil
1/2 cup pure maple syrup
1/4 cup water
1 tsp. pure vanilla extract
8 egg whites, room temperature
1/2 tsp. cream of tartar
1/2 cup sugar
1 recipe Brown Butter Icing (below)

*or substitute 2 1/4 cups cake flour

Directions
Preheat the oven to 325 F. Line the bottom of a footed 10 cup tube pan. Leave the pan ungreased.

Sift together the flour and cornstarch 3 times. Whisk together the sifted cake, baking powder, salt, and brown sugar in a medium bowl. In a small bowl, whisk together the yolks, oil, maple syrup, water, and vanilla. Add the wet ingredients to the dry and stir until smooth.

In the bowl of an electric mixer fitted with the whisk attachment, whisk the egg whites on medium speed until foamy. Add the cream of tartar and increase the speed to high. Whisk until soft peaks form. turn the mixer speed down to low and gradually pour in the sugar. Turn the mixer back up to high and whip until firm, glossy peaks form.

Fold a third of the whites into the batter using as few strokes as possible. Fold in the rest of the whites until incorporated. Gently pour the batter into the lined (NOT GREASED) pan. Bake until the top springs back when gently touched and the top is a light golden brown, about 50 minutes.

Allow to the cake to cool upside down, so the cake is resting on its feet. If your pan does not have feet, use a wine bottle the support the chimney part of the cake. Once the cake has completely cooled, take a long, thin knife and run it along the edge of the pan. Gently knock to pan against a hard surface until it slide out. Top with the icing and serve. Note: when cutting, use a serrated knife and use a sawing motion so as not the crush the delicate cake.

Brown Butter Icing

Ingredients
2 cups confectioners sugar
1 stick unsalted butter, cut into cubes
1/4 cup whipping cream, cold
1/2 tbsp. pure vanilla extract
pinch of salt

Directions
Put the sugar in a medium bowl and set aside. Melt the butter in a small sauce pan over medium heat. Keep heating until the butter turns from a lemony yellow to a dark golden brown. Once the butter has browned and has a nutty smell, add it to the sugar (do this while the butter is hot). Add the cream, vanilla, and salt. Whisk until smooth. As the butter cools the frosting will thicken. Once the frosting has thickened to the desired consistency, spread over the top of the cooled cake.

Tuesday, August 13, 2013

Chocolate Chip Cookie

 
It's been a real long time since I've posted, whoops. Here is my legit excuse: I moved across the country. Yup, yup. I'm now living in South Carolina so I can be close to family and attend school and not have to worry about traveling. The only sucky part is leaving my friends. About 90% of my really good friends attend school in Colorado and I'm not sure when I'll get a chance to go see them face to face again...

But the cool part about moving is I got to switch my Colorado driver's license over to a South Carolina one. I know this shouldn't matter, but the South Carolina license is soooo much prettier than Colorado's... oh and my picture is like a million times better too, haha.

 
So because I'm way late in posting stuff I thought I would give you all some sweet and simple chocolate chip cookies. I know I have about a million chocolate chip cookie recipes on here, but I still haven't found my perfect version yet, and until then I will keep searching! I've actually been looking into how different amounts of ingredients or lack of certain ingredients affects cookies and I have to say I like the look of adding bread flour into chocolate chip cookies as I don't really like adding cornstarch to my cookies. I feel those cookies turn out way too cake-like.

At first glance these cookies may seem like regular ol' cookies but they have a little something extra added to them: turbinado sugar. The turbinado gives a little bit of an extra crunch to the cookie because I don't think it melts the way granulated and brown sugar melt.

This particular cookie isn't as gooey as I would like, but it indeed soft and lovely when warm. I think I like the combination of milk and semi-sweet chocolate. I used semi-sweet chocolate chips and chopped up milk chocolate pieces. When chopping the chocolate, try not to chop it too small or you wont get the great chocolate puddley goodness that all chocolate chip cookies should have.

 
Chocolate Chip Cookie
Slightly adapted rom The Quixotic Table
Makes about 3 dozen

Ingredients
1 3/4 cup unbleached all-purpose flour
3/4 tsp. baking soda
1/2 tsp. salt
1 stick unsalted butter, room temperature
2 tbsp. sugar
2 tbsp. turbinado sugar
3/4 cup + 2 tbsp. dark brown sugar
1 large egg, room temperature
1 tsp. pure vanilla extract
45 g semi-sweet chocolate chips
45 g milk chocolate chips

Directions
Preheat the oven to 350 F. Line a large baking tray with parchment paper.

Whisk together the flour, baking soda, and salt in a medium bowl. In the owl of a stand mixer fitted with the paddle attachment cream the butter and all three sugars on medium-high speed until light and fluffy. Scrape down the sides of the bowl as necessary. Beat in the egg and vanilla. Turn the mixer speed down to low and gradually add the flour. Scrape down the sides of the bowl as necessary. Fold in the two types of chocolate chips.

Using a medium-small cookie scoop (mine is about 1 1/2 inches in diameter), scoop out the dough and space them about two inches apart on the prepared baking sheet. Bake on the center rack for 8-10 minutes or until the edges are slightly golden brown and the centers are still soft.

Cool pan on a cooling rack for a few minutes before removing the cookies onto a cooling rack to cool completely. Enjoy as many cookies as you please with a big ol' glass of milk.

Thursday, August 1, 2013

Butterscotch Krispie Cake with Butterscotch Frosting

 
If you read the blog regularly or maybe semi-regularly you may remember I participate in a wonderful group called Cake Slice Bakers. I have been baking with this group for almost three years and it has been so wonderful!

Today the group turns 5 years old. I think that is pretty significant and so do the other ladies in the group which is why some of use decided to bake cakes as a celebration (check out our birthday cakes on our new Facebook page!).

I didn’t make a traditional birthday for the celebration though. I saw this rice krispie cake Darla had made for Dobby’s birthday and I became obsessed with it.

SIDE NOTE: Yesterday was Harry's, Neville's, and JK Rowling's birthday, so Happy Birthday to them and the group!


I’m slowly starting to fall in love with butterscotch. Last year I made some biscoff butterscotch cookies (they didn’t make it to the blog due to all the cookies being gone before I could take cookies) and they changed my entire perspective on butterscotch.

This “cake” has such a beautiful deep butterscotch flavor due to butterscotch chips strewn throughout and butterscotch sauce (like the kind from Smucker’s). But I also have to give credit to the brown butter frosting that get slathered between the krispie treat layers.

I haven’t worked with browning butter very much. I can count how many times I’ve browned butter on one hand. I don’t think I browned the butter enough for this frosting out of fear for burning it, but it still gave a wonderful caramely flavor.

My favorite part about biting into these was definitely the partially melted butterscotch chips. I think I have officially because a butterscotch lover!


Butterscotch Krispie Treat Cake with Butterscotch Frosting
Adapted from Bakingdom
Makes one 9x13 inch pan

Ingredients
Treats
6 cups rice krispie cereal
½ cup butterscotch chips
4 tbsp. unsalted butter, cubed
10 oz. mini marshmallows
¼ cup butterscotch sauce

Frosting
1 stick unsalted butter, browned and solid
2 cups powdered sugar
Pinch of salt
2 tbsp. butterscotch sauce

Directions
Line a 9x13 inch pan with tin foil. Grease foil with cooking spray.

Combine the cereal and butterscotch chips in a large bowl.  Combine marshmallows and butter in a large saucepan set over medium heat. Stir the marshmallows and butter until both are completely melted into each other. Once the marshmallows have melted pour in the butterscotch and stir until combined. The mixture may bubble a little. Pour the cereal into the melted marshmallow mixture and stir until the cereal is completely coated in melted marshmallows.

Press the hot mixture evenly into the prepared pan. Allow to cool completely.

While you wait for the rice krispie treat to cool, make the frosting. Beat the browned butter in the bowl of an electric mixer fitted with a paddle attachment for 30 seconds. Gradually add the powdered sugar. Scrape down the sides of the bowl as necessary. The mixture may look very dry and crumbly. Beat in the salt and the butterscotch sauce. If the frosting is still too dry add a little bit of milk or cream.

To assemble the “cake”: cut the rice krispie treat in half hamburger ways (if you are not an elementary school teacher this means you cut the cake so you have two 9x6 inch rectangles). Place one of the layers on a serving plate. Spread about 2/3 of the frosting on top of the bottom layer. Stack the remaining layer on top of the frosting. Use the remaining frosting to decorate the top of the cake.