Saturday, February 11, 2012

Milk Chocolate Chip Biscotti


I have been in a sort of baking funk.

The problem is not that I haven’t had the motivation to bake something. The problem is choosing what to bake! I find myself drooling over so many pictures on Foodgawker and favoriting anything that looks good. (I think I’m up to five pages full of deliciousness).

Last week I told you about the snow day that I had and how I made fluffernutter fudge for the Super Bowl. But as I was making them, I knew I wanted something to munch on at home, but what? I could make muffins; muffins are very delicious and I haven’t had one is so long! I could try and make granola bars again (I had previously made some that didn’t make it to the blog), but I wasn’t in the mood for experimenting. I could make more doughnuts, but those would be gone by noon, I wanted something that would last a few days.


I hit the random button on foodgawker more times than I care to remember, looking for inspiration. When I didn’t find any there, I went to the bottom of my bookshelf, home to multiple dessert and snack cookbooks and magazines. Then I saw one lonely little book, no thicker than a quarter of an inch. My biscotti book! I had snagged it for around $2 when Boarders was going out of business. Since I bought the book, I had yet to make anything from it, and I thought this would be a nice opportunity to try one of the recipes out. Plus biscotti lasts for several days, so that means multiple days of crunchy-cookie-munching.


So you may wonder why I’m so glad about a crunchy cookie, when I’ve made it clear before that I’m a soft and chewy cookie gal. Well there is an exception to every rule and biscotti is that exception.

I adapted the recipe only slightly by taking out the lemon zest and adding in milk chocolate chips. I never add milk chocolate chips. When choosing between milk chocolate and semisweet, I always reach for the semisweet, and half the time I would reach for bitter sweet. Never will I ever reach for what “chocolate” though. Where was I going with this? Oh yeah, I never use milk chocolate chips, but for some reason, something told me to use them in the recipe, and following my gut, I poured in the chocolate chips.

The biscotti turned out fantastic! I think I may have under-baked it during round one because it sort of fell apart on me as I was cutting it, but that doesn’t matter because after the second bake, these cookies became crisp perfection. The actual cookie part was crumbly and perfect for soaking up milk (or the traditional coffee for you coffee lovers out there). The milk chocolate chips gave way and melted during the two baking periods, creating a smooth texture with a pleasant creamy taste.


Milk Chocolate Chip Biscotti
Slightly adapted from Biscotti
Makes 38-42 cookies

Ingredients
2 ¼ cup unbleached all-purpose flour
1 ½ tsp baking powder
Pinch of nutmeg
¼ tsp salt
5 tbsp unsalted butter, soft
¾ cup sugar
2 eggs, room temperature
1 tsp vanilla extract
¼ tsp almond extract
½ cup milk chocolate chips

Directions
  1. Preheat the oven to 325 degrees F. Line a large baking sheet with parchment paper; set aside. In a medium bowl, whisk together the flour, baking powder, nutmeg and salt; set aside.
  2. In the bowl of an electric mixer fitted with the paddle attachment, cream the butter and sugar until light and fluffy. Beat in the eggs one at a time until there are no lumps. Beat in the vanilla and almond extract. Turn the speed down to low and carefully add the flour in a little bit at a time. Mix until the dough becomes soft and has come together somewhat. Beat in the milk chocolate chips.
  3. Divide the dough in half (it may be easier to weigh out your dough and then divide it if you want equal amounts). Form each half into a 12 inch long and 1 ½ inch wide log. Place the logs onto the lined baking sheet, spacing them about 2-3 inches apart.
  4. Bake for 25 minutes or until light brown. DO NOT TURN OFF THE OVEN! Let the cookie logs cool for 5-10 minutes on a cooling rack before transferring to a cutting board. With a serrated knife, cut the logs diagonally, making each cookie about ½ an inch thick. Lay the slices flat on the baking sheet. Bake for another 5 minutes, turn all the cookies over and bake for another 5 minutes. Let the cookies cool on a rack.

Sunday, February 5, 2012

Fluffernutter Fudge Squares


On Friday something happened that never happens: my school got a snow day. My school district is one of the meanest stubborn school districts in Colorado, I think. I think it was just this past December, but there was another huge snowstorm and pretty much all of Colorado schools shut down, except for just a few. My school district was one of them. I mean come on! Half the schools are in Boulder (where it got the most snow) and we still didn’t get a snow day. Something is seriously wrong there. But this time we did get a snow day (probably due to the fact that there would be a mutiny if we didn’t).

So what did I do with my snow day? Well after waking up at 5:15 am (like normal) and being told by my dad that he got a call at 4:30 am saying that school was closed, I couldn’t go back to sleep. So I read for about an hour, worked on some homework/notes, had a mini marathon of Lie To Me (totally addicting show that I wish hadn’t been canceled), and surfed around Foodgawker.


Most people talk about Pinterest being a time-sucker, but to me, it’s Foodgawker. That place is so addicting and the pictures make my mouth water. One of the amazing things I found was a recipe for fluffernutter bars by Bakers Royal.

In case you don’t know what a fluffernutter is: it’s a peanut butter and jelly sandwich, but in place of jelly, marshmallow fluff steps in. It is one seriously awesome sandwich!

This bar (which is a little more like fudge) is just like a fluffernutter, but with a little bit of chocolate added thanks to the Reese’s added to it.


I will admit that I had some difficulty with the recipe. I had adapted the recipe (doubling most of the ingredients and slightly raising the amount of others) so that I would get enough to make a 9x13 amount instead of the 8x8 in the original. However, there seemed t be too much extras and not enough of the binder, which kinda frustrated me, but it all turned out find once I got the hang of folding all the ingredients together.

The end result was a mix of deliciousness. The fudge squares are crunchy from the nutter butters, yet chewy from the mini marshmallows, and creamy and chocolatey from the Reese’s and melted marshmallow and peanut butter chip mixture. It really is a nuttberbutter in a compact one inch square


Fluffernutter Fudge Squares
Adapted from Bakers Royal
Makes enough to fill a 9x13 inch pan

Ingredients
135 g nutter butter cookies, chopped
12 Reece’s peanut butter cups, chopped
6 cups mini marshmallows, divided
4 tbsp unsalted butter, cubed
10 oz peanut butter chips

Directions
  1. Line a 9x13 inch pan with tin foil, leaving a small over hang; set aside. Place the chopped nutter butter cookies, Reece’s cups, and 2 1/2 cups of the mini marshmallows into a VERY large bowl; set aside.
  2. Place remaining marshmallows into a sauce pan over low heat. Stir until the marshmallows start to melt. As the marshmallows melt, slowly add in the butter, stirring all the while. Once the marshmallows and butter have fully melted, add in the peanut butter chips in four stages, stirring to help incorporate and melt chips. Remove from heat.
  3. Pour the peanut butter-marshmallow mixture over the cookies, peanut butter cups, and mini marshmallows. Fold to combine (this will take a little lot bit of elbow grease). Pour mixture into the prepared pan. Spread it out so it’s evenly distributed throughout the pan and refrigerate for 30 minutes to 2 hours or until set.
  4. Using the foil overhang, lift the bar out of the pan. Cut the bar into squares.  

Monday, January 30, 2012

Double Chocolate Cookies


So last weekend I had all intensions of using the left over can of pumpkin puree from this past November. I had all intensions of making this. Doesn’t it look delicious? As soon as I saw this I wanted to bake it so bad! And it has a crumble on top; I can’t resist the crumble!

Sadly, I did not get a chance to bake that lovely little pumpkin treat on a count of I got a chocolate craving; a HUGE chocolate craving. After I got this chocolate craving, I realized I hadn’t made cookies in such a long time. This had to be fixed, and quick. So I browsed through Foodgawker searching for a double chocolate chip cookie because what could satisfy a hankering for chocolate for than a chocolate cookie studded with chocolate chips?


I have to be honest: I was a little…maybe a lot… nervous about making these double chocolate chip cookies. The recipe calls for melted chocolate, which makes for a delicious fudgy cookie. The last time I worked with melted chocolate in a cookie, it went terribly wrong, wrong, wrong.

The batter for this was so lusciously thick; it reminded me of dense brownie batter. Even before the flour was added, I was mesmerized by how the creamy mixture of the eggs and sugar combined with the velvety smooth butter and chocolate. It thickened up quite nicely, and then I added the flour and this fudgy dough appeared right before my very eyes. It was magic.


The original recipe says that the recipe would make two dozen cookies, but again, I got 56 cookies, that’s almost 5 dozen cookies! But I don’t mind, it means I can have three for the price of one. However, I can’t have a whole bunch of cookies just sitting around, so I put to work this new trick I learned and froze the left-over portioned out cookie dough.

I only baked a dozen initially (and stored the rest away) and my dad loved these so much he had eight cookies for dessert! These cookies are best eaten right out of the oven, especially with a glass of milk. Do it. As soon as the timer goes off, take the cookies out of the oven and just stand there eating the cookies right off the tray, you won’t be sorry.


Double Chocolate Cookies
Adapted from Leela Cyd
Makes 56 small cookies

Ingredients
4 oz bittersweet chocolate, chopped
7 tbsp butter
1 tsp vanilla extract
2 eggs, room temperature
1 cup + 1 tbsp sugar
1 cup unbleached all-purpose flour
½ cup natural unsweetened cocoa powder
½ tsp salt
½ tsp baking soda
200 g semisweet chocolate chips

Directions
  1. Preheat the oven to 325 degrees F. Line a baking sheet with parchment paper; set aside. Fill a small sauce pan with about an inch of water. Let it come to a simmer and place a glass bowl on top. Sift together the flour, cocoa powder, salt and baking soda; set aside.
  2. Add the chopped chocolate and butter to the double boiler, stirring occasionally. Once the chocolate and butter have completely melted, take the bowl off the heat (careful not to burn your hands with the steam!) and add in the vanilla. Set the bowl aside to cool.
  3. Place the sugar and eggs in the bowl of an electric mixer and beat on medium until creamy and light in color, about 3 minutes. Slowly pour in the melted chocolate mixture into the bowl and beat until all of the chocolate has fully integrated with the sugar and egg mixture. The batter will start to become thick, so scrape down the sides of the bowl.
  4. Turn the speed down to low and gently add in the flour and cocoa mixture. Stir until combined. Stir in the chocolate chips. Using a portion scoop of your choice (I really need to get a bigger one) scoop out the dough and place them on the parchment lined baking sheet about 1.5-2 inches apart. Bake in the middle rack for 9-11 minutes.
  5. Take the cookies out of the oven and set the tray on a cooling rack for about two minutes. Remove the cookies from the tray onto the cooling rack to cool completely. Or you can do what I did and take a cookie (hot out of the oven) right off the tray and enjoy the fudgy cookie with sinfully amazing melty chocolate chips. 
Note: If you don’t get a chance to eat one hot out of the oven, microwave the cookies for 9 seconds and the chocolate chips will become just as melty and delicious.  

Friday, January 20, 2012

Cake Slice Bakers - January 2012: Chocolate Almond Cake

I have been a bad girl lately. Well, not really bad per say, but I’ve been sort of lazy and have neglected Cake Slice Bakers. I’ve only missed a month, but it feels so much longer. For the month of December the Cake Slice Bakers made Buche de Noel. I knew as soon as I saw the recipe was winning that I would not be able to make it. For one I had to study for finals that month, and two I would be leaving for vacation and I didn’t want to make a huge cake.


This month I actually sorta kinda participated in January’s recipe. This month we were supposed to make a Tiramisu Cake, but since I don’t like coffee, my sister doesn’t like coffee, my mom is away on business and my dad has been watching what he’s been eating, I knew that cake would never have a bite taken out of it. So instead of making the winning cake, I made the cake that I voted for: the Chocolate Almond-Coconut Cake.


This cake is similar to a flourless cake. Similar because it has 2 tbsp of flour and it uses egg yolks as well as egg whites. The cake is basically supposed to be an Almond Joy candy bar…but in cake form. I’ve tried Almond Joy before, and I do not like it one bit. The coconut is way too sweet and the almond on top just throws everything off in my opinion. So if I don’t like Almond Joy, why vote for an Almond Joy cake? Well I love the flavor of almond and I love chocolate, plus I could omit the coconut called for in the recipe, which is exactly what I did.


Along with omitting the coconut, I also took out an egg yolk, reduced the amount of butter by half a stick and only used 8 oz of almond paste instead of 12 oz (because I’m cheap and didn’t want to buy two cans when I would only use one and a half). The end result was marvelous! The flavor was so almondy, I couldn’t imagine adding in that extra 4 oz of almond paste. The cake was also really dense and was just so perfect. The chocolate ganache/glaze thing that went on top also added a nice little flavor of chocolate because I couldn’t really taste it in the cake itself.


Sadly, I was the only person that ate this cake…and sadly I could only eat a few slices (there comes a point in time when eating cake night after night become redundant and you want something else for dessert). This really is a good cake if you like/love the flavor of almond.


Side note: I really like the smell of almond. I like it so much, my dad got me almond lotion for Christmas. It’s awesome and I use it every day!


Chocolate Almond-Coconut Cake
Adapted from The Cake Book by Tish Boyle

Ingredients
2 tbsp unbleached all-purpose flour
½ cup + 2 tbsp Dutch-processed cocoa powder
8 oz canned almond paste
1 ¼ cups sugar
4 eggs, room temperature
1 ½ sticks unsalted butter, softened


Directions
  1. Preheat the oven to 350 degrees F. Line a 9 inch cake pan with parchment paper and spray with cooking spray; set aside. Sift together the flour and cocoa powder into a small- or medium-sized bowl. Set aside as well.
  2. Break the almond paste into tiny cubes and place in the bowl of an electric mixer along with the sugar and one egg. With the paddle attachment, beat on medium speed until smooth. Add the softened butter and beat on medium until light and fluffy. Add in the remaining eggs, one at a time, and beating well after each addition. Scrape down the sized of the bowl as necessary. Reduce the speed to low and slowly add in the cocoa and flour mixture. Mix until combined.
  3. Scrape the batter (it will be thick) into the prepared pan and smooth the top out. Bake for about 40-45 minutes or until a tooth pick comes out relatively clean when inserted. Cool the cake in the pan on a wire rack for 10 minutes. Invert the cake onto the cooling rack to cool completely. Transfer the cake onto a serving plate and top with chocolate ganache.
Chocolate Ganache

Ingredients
3 oz bittersweet chocolate, chopped
1/3 cup half and half

Directions
  1. In a small sauce pan bring half and half to just before a boil. Turn down the heat and add in chopped chocolate. Stir until all the chocolate has melted. Pour the chocolate mixture into a small bowl and let it sit for 10-15 minutes. Pour ganache onto the cake. If you want to ganache to be a little firm when serving the cake, place it in the fridge for a couple of hours.

Tuesday, January 17, 2012

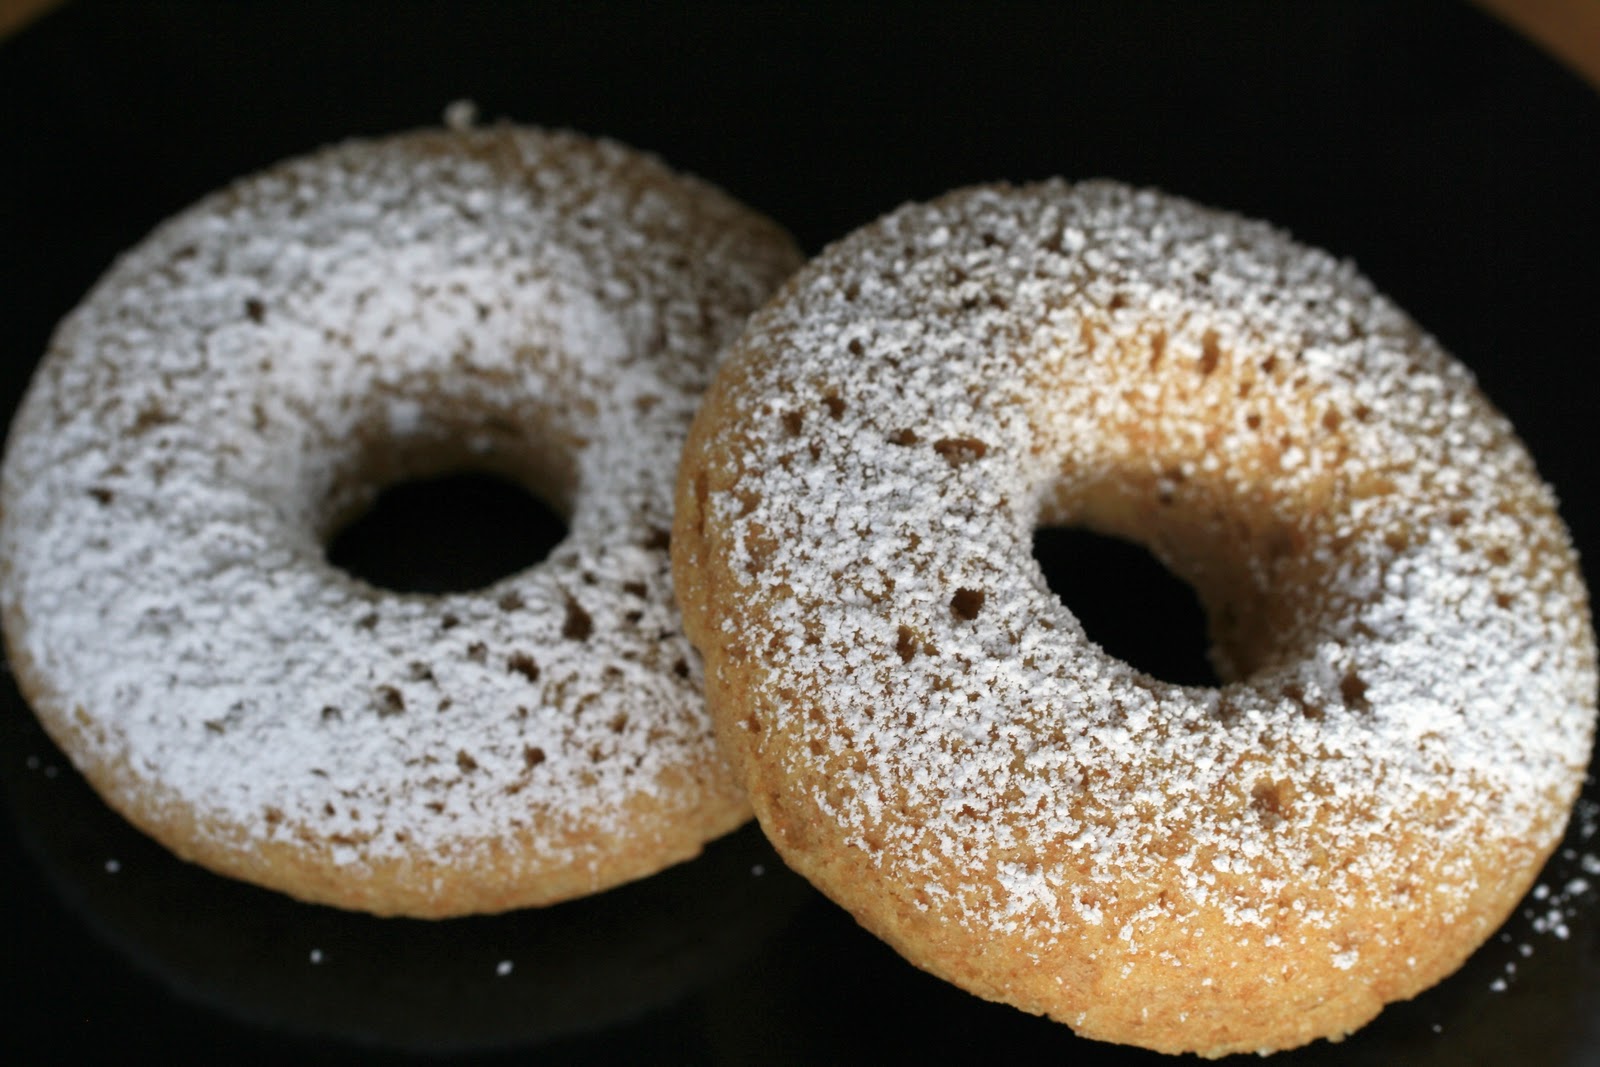
Whole Wheat Baked Doughnuts


I am oh so very excited about today’s post!

You see, I got this new thing that has been sneaking into blogs slowly, but surely. I personally think it will take over cake pops, maybe even cupcakes.

Wanna know what this marvelous thing is? It’s the baked donut. No, it’s not a yeasted dough which you cut out and bake (which would be cool to do sometime), but these baked doughnuts are made in a donut pan. I’m in love with this pan. 


I haven’t had a traditional, deep-fried, glazed doughnut in about a year and a half. I don’t eat much (if any) fried foods. The last time I ate at a fast food restraint was last summer when my family and I were going to see a play in New York and we needed to get some grub, fast. I don’t remember it being particularly great. But before last summer, I hadn’t had fast food since the first semester of my sophomore year in high school; it’s now the second semester of my senior year. I just don’t like the weird bloaty feeling that it gives and because I haven’t had the stuff in so long, the smell kind of repulses me.

Boy, did I get off on a tangent. Here I am writing about gross fast food when I should be talking about these delicious donuts. By the way, have you noticed I’ve been switching the spelling from donut to doughnut? Yeah, that’s because I have no clue how to spell it and Good doesn’t help because pictures of doughnuts pop up for each spelling. Sigh. Oh well.


So these donuts are healthy, but just because they are healthy, don’t turn your nose up at them. Like I said before, these babies are baked in a special pan. (Don’t have that pan? Click here. Izy didn’t have a donut pan either and she made an awesome one out of tin foil.) Also, instead of using all-purpose flour, I used whole wheat flour because 1. I have about half a bag full of the stuff and I need to use it, and 2. I thought it would give a nice flavor and color to the doughnuts, and I was right!

The batter is so easy to whip together, seriously. The batter came together in about 5 minutes, tops! And it’s really not a messy recipe either. Don’t you hate it when you dirty up like all the bowls in your house? Yeah, this one dirties up like two and that’s counting the measuring cup.


The doughnuts have a sweet, yet hearty flavor, due to the whole wheat, and probably taste best within a few hours after they have been baked. After about 12-16 hours, they get a little sticky (the powdered sugar that I put on could have something to do with that), but they still tasted wonderful. I can’t wait to keep trying out different donut recipes because to me, these doughnuts rival their fried counterpart.


Whole Wheat Baked Doughnuts
Adapted from For the Love of Cooking
Makes 6 donuts

Ingredients
1 cup whole wheat flour
¼ cup + 2 tbsp sugar
1 tsp baking powder
½ tsp salt
¼ cup buttermilk
2 tbsp milk
1 egg
1 tsp vanilla extract
1 tbsp unsalted butter, melted and cooled

Directions
  1. Preheat the oven to 325 degrees F. Coat the donut pan in nonstick spray and set aside.
  2. In a medium bowl, combine the flour, sugar, baking powder and salt. In another bowl (or a measuring cup) stir the buttermilk and milk (I used a combination because I was using buttermilk powder and I was too lazy to convert the powder to make two tbsp of buttermilk. You can use all buttermilk if you wish.), egg, vanilla and butter. Pour the liquid ingredients into the dry and mix until well combined.
  3. Fill a piping bag (I just used a zip lock bag and cut a hole in the corner) with the batter. Fill each donut compartment about half full with the batter. Bake for 7-9 minutes or until the donut feels soft when poked. (My doughnuts did not spring back when they were poked, but they were nevertheless done.) Cool in the pan for about 2 minutes. Invert the doughnuts onto a cooling rack to cool completely. Dust with powdered sugar and serve.

Monday, January 9, 2012

Lady Baltimore Cake with Chocolate Frosting


Last week I mentioned that I was turning 18 in a few days. Well I am now 18 and I am proud to say I have not done anything stupid like get a tattoo; however, one of my friends said he was going to take me to a strip club….

Annnyyways, what is a birthday without cake? A pretty sad one I would say. For the past two birthdays (first my sister’s and then my mom’s) I have been making the birthday cakes. I think it’s more special and fun that way; plus you get to control what’s going into the cake and what grocery store bakery would bake a brown sugar cake? Not many I am sure. Last year, and the year before that, and the year before that, and so on, I had a store-bought cake. Well not this year; this year I opted to make my own birthday cake.


For Christmas my dad got me this really cool multi-tiered cake pan. It’s square, but it has four molds that create a three-tiered cake look. I knew I wanted to try it out at some point, and it took me all of two seconds to come to the decision that I would make my birthday cake in my new cake pan-toy. And, just so you know, it is awesome! If you properly grease the pan, the cakes come straight out and they look so adorable. The only thing I recommend is that you slice the tiers before frosting the cake because for one, it’s easier to frost, and two, you get to have a filling like a real tiered cake.

So this year I went with a vanilla cake with chocolate frosting-a.k.a a classic. I like the contrast of white and chocolate together. I originally only made two tiered cakes, but after my family and I ate both, I decided to make the cake again on Sunday (we celebrated on Saturday because I had to work on my actual birthday-the 6th) because I didn’t get a chance to take pictures of the original cakes. The one I made on Sunday didn’t turn out nearly as pretty as the first two, but that’s ok, it still tastes great!


The cake itself is so fluffy and soft. And I think I may have mentioned before, that I am not a frosting person, I think that buttercream frostings are way too sweet (maybe I should give Swiss Meringue Buttercream a try?), but this chocolate frosting wasn’t too sweet; it was actually very tasty and soft. Then again, I did take out almost half a cup of powdered sugar out of the mix.

The recipe I have down below is enough to fill two of the multi-tiered cake molds or one 8 inch round cake pan. If you follow the link, it will give you the full recipe for a normal three-layer cake. The frosting recipe on the other hand is enough to frost a two-layer 9 inch cake or all four mini multi-tiered cakes.

**I know the pictures aren't too pretty, but that's what happens when the first "pretty" batch gets eaten and you remake the recipe in haste. 

Lady Baltimore Cake
Adapted from Sing for Your Supper

Ingredients
½ stick unsalted butter, room temperature
2/3 cup sugar
1 cup cake flour
1 tsp baking powder
2 pinches of salt
2 tbsp + 2 tsp milk
2 tbsp + 2 tsp water
½ tsp vanilla
2 egg whites, room temperature

Directions

  1. Preheat the oven to 350 degrees F. Grease your chosen pan (if you actually have the multi-tiered cake pan, be sure to generously grease it) and set it aside.
  2. Cream the butter and sugar together until it is nice and fluffy. Sift the flour, baking powder, and salt together; set aside. Combine the milk, water and vanilla extract; set that aside too.
  3. Add about a third of the flour mixture to the creamed butter-sugar mixture. Pour in about half of the liquid. Keep alternating the two until both are used up. Scrape down the sides of the bowl as necessary.
  4. In a medium bowl, beat the egg whites until stiff peaks form. Fold stiffened egg whites into the batter. Pour the batter into the prepared pan (if using the funky pan, don’t fill it more than the first two tiers). Place in the oven and bake for 20-25 minutes (same time frame goes for the multi-tiered cake pan).
  5. Take the pan out of the oven and let it cool before inverting it onto a wire rack to finish cooling. Frost the cake after is has been cooled completely.


Chocolate Frosting
Adapted from The Pastry Affair
Ingredients
1 stick unsalted butter, room temperature
2 cups + 2 tbsp powdered sugar
2/3 cup natural cocoa powder
1/2 tsp vanilla extract
1/4 cup milk

Directions
  1. In a large bowl, beat the butter until completely smooth (no lumps). Gradually add in the powdered sugar and some cocoa powder followed by a drizzle of milk. Keep doing this until you have used up the powdered sugar, cocoa powder and enough milk has been added for desired spreading consistency. Beat in the vanilla. Frost the cake to your hearts content.    

Wednesday, January 4, 2012

Peppermint Kisses


Wow, I can't believe it's already 2012! And I can't believe I'll be turning 18 in just two days! Time really does fly. I know I haven't posted anything since Christmas Eve, but I have a good excuse, honest. You see... I ended up going to my Grandma's house in South Carolina from the 27th to the 31st and then the famly and I went up to New York City for New Years (no I didn't get into Times Square...only the crazies who don't eat or have bladders do that), but I'm back now and I'm posting about cookies that I made in mid December. I know you all have left-over candy canes, so this is a great ways to use those up.

I had an absolute blast making this dough. I don't know why, but I don't think I have ever been so excited over a cookie. Maybe it was the spirit of the holiday season that was filling my brain, but I don't care.

When making this dough I was so giddy because as soon as I added the crushed candy canes to the dough, it all turned pink! I was so excited over this I made everyone in my family look at the rosey pink dough. I think my mom did the best job at being enthusiastic for me. My sister just kinda gave me the "I'm judging you" face.


These cookies were definitely a hit, especially with my mom. She kept nibbling on them all day and the next day. But be careful when baking, because the cookies will still look super puffy and uncooked, but that's when you need to take them out, like ASAP, because they will settle down and crinkle up on the top.

I hope everyone had a wonderful Christmas and an awesome New Year. I've already come up with a very long list of what I need to make by the end of this year.

Peppermint Kisses
adapted from Sing for Your Supper
makes 3 1/2 dozen cookies

Ingredients
2 cups unbleached all purpose flour

1/2 tsp salt
1/2 tsp baking powder
12 mini candy canes (or about 3 large ones?)
1 stick unsalted butter
1 cup sugar
1 egg
1 egg yolk
1 tsp vanilla extract

Directions
  1. Preheat the oven to 350 degrees F. Line a baking sheet with parchment paper, set aside.
  2. In a food processor (or by hand) crush the candy canes to a fine powder. It's ok
  3. In the bowl of an electric mixer cream the butter and sugar until light and fluffy. Scrape down the sides of the bowl as necessary. Add in the egg and egg yolk and mix on medium for about a minute or until the eggs have fully been incorporated. Beat in the vanilla. Reduce the speed to low and slowly add in the flour mixture. Scrape down the sides of the bowl as necessary. Beat until all of the flour mixture has been incorporated.
  4. Using a portion scoop, drop the cookies on the lined baking try, spacing them about an inch and a half apart. Bake for about 6 minutes, no more than 8. The cookies will look very underdone, but don't pay any attention to that, take those cookies out of the oven! Let the cookies cool on the baking sheet for about a minute before transferring to a wire rack to cool completely.
Related Posts Plugin for WordPress, Blogger...